Decorating a Cake
For cakes as exquisite as these, the decoration has to be of the finest quality as well. I follow the same
decorating philosophy: decoration should be an extension of the cake itself, contributing not only
to the cake’s appearance but also to its taste. Although I have spent some unforgettable childhood moments with my aunt
making fondant figures (fondant is a sugar-based mass used for cake decoration), with special accent on roses, I did not
include such decorations in this book. Even though fondant figures are edible, they do not complement the cake’s taste and
are actually not meant to be eaten. This is why I do not use fondant decoration or artificial colors in my recipes. However,
decoration is up to the chef to decide, and you are the master chef in your own kitchen!
Chocolate decorations:
There are various options for chocolate decorations. The most common is grated chocolate. To grate chocolate coarsely, bring it to room or slightly higher temperature. Cold chocolate is brittle and easily breaks, hence grating cold chocolate will produce smaller pieces. The same holds for chocolate curls, which cannot be made at all if the chocolate is cold and brittle. To make chocolate curls, warm the chocolate before grating or melt it with a little bit of butter and grate after the new mass is firm. Use a vegetable peeler or cheese slicer.
To make different shapes from chocolate, first melt chocolate with a little bit of butter and then allow it to cool while continually stirring until it reaches the desired consistency. Use a paintbrush to paint chocolate over leaves of different types of plants or trees (wash and dry the leaves before painting them). Once the chocolate dries and hardens, gently take it off the leaves. You will end up with life-like chocolate leaves. You can also pour the melted and slightly cooled chocolate into cookie cutters placed on a piece of aluminum foil or pour the chocolate on a piece of aluminum foil placed on a flat surface, wait until it partially hardens, and then use a knife to cut out strips and other geometrical shapes.
Buttercream/whipped cream decorations:
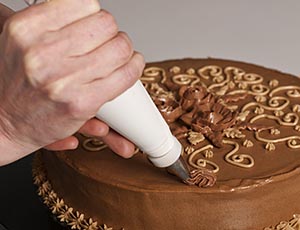
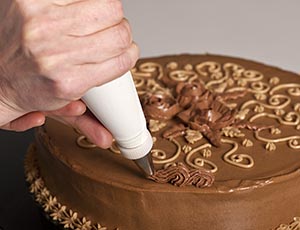
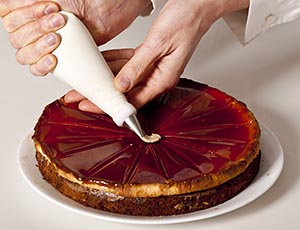
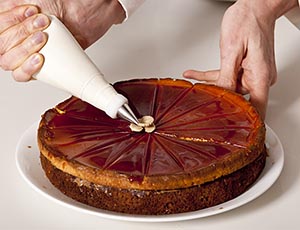
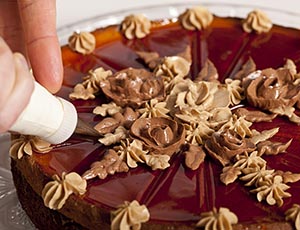
The most effective and popular way to decorate buttercream cakes is to use the same cream that is used for the filling to make piped decorations. Whipped cream can be used in the same manner. I use a special decorating pastry bag fitted with a special tip coupler, which allows for interchangeable metal tips. All are commercially available. Tips are metal cones with holes cut in different ways defining the shape of piped buttercream. The tips I most frequently use have holes in the shape of a star or dot, but there are endless other varieties, including tips for making leaves (shown in photo 6) and rose petals (shown in photos 4 and 5). There are plastic syringe-type decorating kits available on the market, which may look easier to use, but offer limited decorating options and are awkward to use for more elaborate designs. Also, plastic tips are inferior to metal ones because they do not define the shape of the cream as well.
The following introductory advice, common sense, and imagination may further extend your decorating skills. Or you can seek additional help from the extensive published literature in this field. And, of course, as with other skills, “practice makes perfect”.
Chocolate decorations:
There are various options for chocolate decorations. The most common is grated chocolate. To grate chocolate coarsely, bring it to room or slightly higher temperature. Cold chocolate is brittle and easily breaks, hence grating cold chocolate will produce smaller pieces. The same holds for chocolate curls, which cannot be made at all if the chocolate is cold and brittle. To make chocolate curls, warm the chocolate before grating or melt it with a little bit of butter and grate after the new mass is firm. Use a vegetable peeler or cheese slicer.
To make different shapes from chocolate, first melt chocolate with a little bit of butter and then allow it to cool while continually stirring until it reaches the desired consistency. Use a paintbrush to paint chocolate over leaves of different types of plants or trees (wash and dry the leaves before painting them). Once the chocolate dries and hardens, gently take it off the leaves. You will end up with life-like chocolate leaves. You can also pour the melted and slightly cooled chocolate into cookie cutters placed on a piece of aluminum foil or pour the chocolate on a piece of aluminum foil placed on a flat surface, wait until it partially hardens, and then use a knife to cut out strips and other geometrical shapes.
 |
 |
 |
Buttercream/whipped cream decorations:
The most effective and popular way to decorate buttercream cakes is to use the same cream that is used for the filling to make piped decorations. Whipped cream can be used in the same manner. I use a special decorating pastry bag fitted with a special tip coupler, which allows for interchangeable metal tips. All are commercially available. Tips are metal cones with holes cut in different ways defining the shape of piped buttercream. The tips I most frequently use have holes in the shape of a star or dot, but there are endless other varieties, including tips for making leaves (shown in photo 6) and rose petals (shown in photos 4 and 5). There are plastic syringe-type decorating kits available on the market, which may look easier to use, but offer limited decorating options and are awkward to use for more elaborate designs. Also, plastic tips are inferior to metal ones because they do not define the shape of the cream as well.
 |
 |
 |
The following introductory advice, common sense, and imagination may further extend your decorating skills. Or you can seek additional help from the extensive published literature in this field. And, of course, as with other skills, “practice makes perfect”.
- You can make different shades from the same buttercream for decorating purposes. For a lighter shade, use an electric mixer to beat some butter (with or without superfine sugar) until it is cream-like. Then, add into it a little bit of the original buttercream and mix well. For a darker shade, melt some chocolate, let it cool (see the instructions on melting chocolate on the "tips & tricks" page), and add it to the cream. Or, add a little bit of very strong coffee. Instant coffee, with or without sugar, dissolved in a few drops of water, works very well, too.
- To prepare the pastry bag for use, first fit the bag with the desired tip, then place the bag on a flat surface and use a metal spoon to fill it. Hold the bag vertically by its wide opening and shake it a few times to push all of the buttercream toward the tip and eliminate air. Make sure that there is no air in the buttercream, otherwise it may unexpectedly splash during pattern-piping. Then, twist the remainder of the bag around itself to enclose the buttercream. Press the bag until the buttercream is about to emerge from the tip.
- After filling the pastry bag, always test if the pattern is emerging correctly as there still may be some leftover air at the bottom of the bag. Use a clean plate for this purpose, which you can also use to test the pattern.
- When using a pastry bag for buttercream decoration, be careful not to let the buttercream soften too much during the process. If you hold it for a long time, your hands will warm it up. This may cause it to soften too much to work with or may even melt it, which is why you should hold the bag only while piping from it, setting it aside in the meantime.
- Piping decorations from a pastry bag is a task that seems very complicated for a beginner, but this skill quickly improves with practice. Take the filled bag in your dominant hand, hold the wrapped top between your index finger and thumb and place the rest of your fingers around the part filled with buttercream. With your other hand, gently hold the tip. Hold the pastry bag at a right angle to the decorating surface for piping stars and dots. Hold it at a 45 degree angle for piping leaves, lines, and other continuous patterns. The angle varies for piping wreaths, as shown in the top triplet of photos.
- To start piping, first position the tip to almost touch the surface of the cake, then apply pressure to the bag. The cream will start to emerge from the tip. Lead the tip with both hands in the desired direction and combine applying and releasing the pressure for different patterns. To finish a pattern, always release the pressure first and then lift the bag. First try the desired pattern on a plate to test it. When you gain confidence, start working on a cake. Different patterns are made with different combinations of pressure control and wiggling.
- To make the wreath pattern shown in the top triplet of photos, repeat piping pattern segments (shown in the first photo of the triplet). To start a pattern segment, hold the bag at a right angle to the decorating surface (as shown in the second photo). Apply pressure and the cream will start emerging from the tip. Slowly tilt the bag toward a 45 degree angle and move in the desired direction while gradually decreasing the pressure (as shown in the third photo). Finish the pattern segment by completely releasing the pressure. Now you are ready to make the next pattern segment and so on until you finish the whole wreath around the edge of the cake. (Note that it is easier to pipe in the direction toward yourself and that you can occasionally stop to rotate the cake to the most convenient position.)
 |
 |
 |